To Mod or Not to Mod?

Taken with my modded a7s
The process of removing filters from a camera sensor with the purpose of increasing its sensitivity to spectra of light of astronomical interest is something that will concern anyone seriously involved in astrophotography at some point. For those exclusively engaged in this type of photography, there is no doubt about the necessity of converting their camera, as the disadvantages of this process do not affect them. But is it the same for others who are involved in various types of photography?
Advantages:
The sensors of digital cameras have filters that block various spectrums of light in order to capture the reality around us in the same way that our eyes perceive it. Removing these filters makes it much easier to capture the light emitted by celestial objects as it increases the signal that the sensor is capable of receiving.
Since the light is not blocked, less time is needed to capture it.
Narrowband imaging is possible.
Disadvantages:
Removing the sensor filters results in capturing all images in the red spectrum, which makes it necessary to adjust the white balance for each daylight shot.
In some mods, there is a need for a UV/IR cut external filter to enable focusing with diffraction lenses and telescopes.
Depending on the camera, full conversion can result in losing the ability for automatic focusing.
Additional external filters and accessories are needed depending on the spectrum we want to photograph.
Loss of factory warranty, if it exists.
Conversion cost.
Types of conversions

Sensor stack
LPF-2 Removal
Removal of the LPF-2 filter (Ha mod) which blocks and replaces it with an IR filter that allows our sensor to capture more of the hydrogen alpha (Ha) wavelength emitted by some of the most impressive celestial objects. Autofocus is maintained. The use of an external UV/IR cut filter is not necessary. The Moire effect disappears. The most common modification that most people make.
Full spectrum mod
Full Modification involves removing both the LPF-1 and LPF-2 filters, which exposes the sensor to the full spectrum of light, including the wavelengths of light emitted by celestial objects such as hydrogen alpha Ha, oxygen Oiii, and sulfur Sii. This allows for the capture of stunning and detailed astrophotography images. However, autofocus may be lost in some cases, and an external UV/IR cut filter and narrowband filters may be necessary to eliminate unwanted light pollution and to focus on specific wavelengths. It is important to note that shooting and focusing on each filter needs to be done separately. Additionally, this modification opens the door to infrared photography.
Monochrome
The removal of LPF-1, LPF-2, and RGB arrangement, also known as the "triple play mod," is a significant modification that brings the camera closer to specialized monochrome photographic CMOS and CCD cameras. This process removes the low-pass filter and the RGB color filter array, resulting in a highly sensitive large-size sensor that can record a broad spectrum of light in astrophotography.
However, there are some drawbacks to this modification. Firstly, the cost of the conversion is relatively high, and the process involves some risks that may damage the camera permanently. Secondly, only a small number of specialized individuals carry out this conversion, limiting accessibility to the modification.
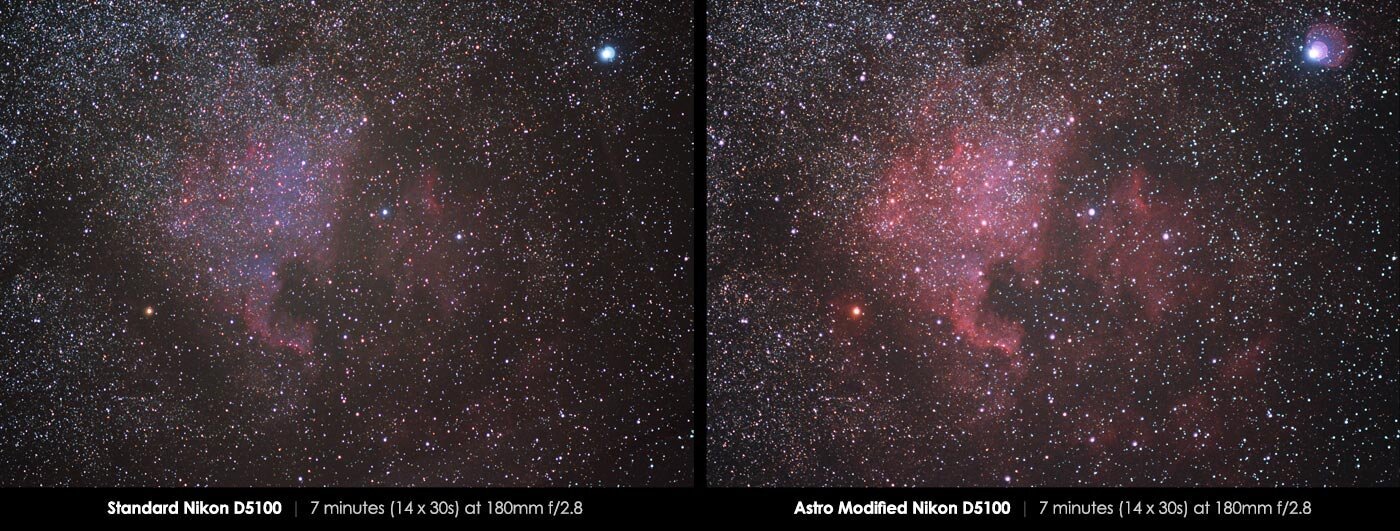
Stock vs modified Dslr. Images from noctilove
Among the various options for modifying a DSLR camera for astrophotography, only the first and second options are still commonly used. The first option, which involves removing the LPF-2 filter and replacing it with an IR filter, is popular among those who use their camera for both daylight and night photography. The second option, which involves removing both the LPF-1 and LPF-2 filters, is preferred by serious astrophotographers who dedicate their camera solely to capturing celestial objects.
My advice to those interested in astrophotography is to first try taking photos of celestial objects with the camera they already have. This will help them identify any shortcomings, such as noise or strong UV/IR cut filters, and determine which astronomical targets interest them the most. Once they have this information, they can decide whether to modify their existing camera or invest in a specialized astrophotography camera. I did the opposite and I had to deal with frustration in post-processing after shooting studio products where color accuracy needs to be high.
Another example, is if someone owns a camera with a low noise signal and enjoys photographing open clusters, it may not be necessary to undergo a conversion or buy a new camera. On the other hand, if someone is interested in wide-field or deep-sky photography, it may be preferable to either convert their camera or buy a specialized camera.
It's important to keep in mind that modifying a camera can be expensive, with costs ranging from 250-400 euros depending on the conversion chosen. Additionally, the cost of replacing the filter (clear, Baader, Lifepixel, Astrodon) should also be considered.
For those who are casually involved in astrophotography, it's generally better not to proceed with any modifications. Instead, investing in a tracker may be a more cost-effective solution for landscape astrophotography.
In summary, taking the time to determine individual needs and goals is crucial when considering whether to modify an existing camera or invest in a specialized one.
Below is a list of companies and professionals who undertake conversions on DSLR/mirrorless cameras in Europe, America, and Australia. For those interested, many of these companies also sell new cameras that are already modified.