"The Power of Calibration Frames in Astrophotography: A Step-by-Step Guide"

Importance of calibration frames in astrophotography
The degree of complexity involved in capturing and processing a single astrophotograph shows why the latter is rightly considered one of the most challenging areas of photography. It is not wrong to say that three-quarters of the processing that astrophotos receive is to overcome the limitations of our equipment. Part of this processing is the Calibration frames which are practically all shots taken after the end of the standard shots (lights) to correct the noise produced either by the electrical parts of the camera or by the thermal noise of the sensor, the noise from light pollution as well as to remove visual problems in our system such as vignetting and dust. Their effectiveness is so great that they should not be omitted by any beginner astrophotographer.
Types and How to Take Calibration Frames
Calibration frames as we already pointed are images that are used to correct for the various imperfections and biases that can be introduced by the camera and imaging equipment. There are three main types of calibration frames: dark frames, bias frames, and flat frames.
Dark frames
An exposure that is made in total darkness and has the same duration, iso, shutter value, and temperature as our light frame is called Dark. In it, the bias signal (Bias) is recorded as well as a small current produced by random electrons in the circuit of our camera and activates the pixels of our sensor even when they do not collect light. Within these signals are noise patterns such as hot & cold pixels that we need to remove from our photos. This noise is directly dependent and proportional to exposure time and camera temperature. Darks are even used to remove amp glow, a problem that is common in more modern CMOS and some CCD sensors and is an uneven distribution of heat on the sensor produced by some electronic subsystem of the camera such as a motherboard.
How to take Dark Frames
We place the lens cap or the shade of our telescope and take multiple shots with the same settings and at the same temperature that we shot our lights. The general rule is the more shots the better but most agree that 10-50 shots work satisfactorily based on the equipment we have. The difficult part of the dark frames lies in identifying them with the temperature the sensor had during the capture of the lights. In cooled CCDS there is no particular problem as the temperature is easily regulated and the shots do not even have to be done on the same day. On the contrary, things are more complicated in DSLR and mirrorless so there are two approaches to the problem.
In DSLR there is an automated process that we find in the menu as long exposure noise reduction (LENR). The application works very well and removes many of the hot pixels since each dark is taken directly after each light so the temperature remains the same but at the cost of the precious time from photon collection. For this reason, most astrophotographers prefer to shoot Darks after the end of the Lights. But why after and not before taking the lights? According to many, the answer lies in the fact that the temperature of the sensor is not the same during the shooting of the lights, but after a while it stabilizes, so the temperature of the shooting of the darks if done immediately after the lights, reaches the average temperature of the lights.
The only way to avoid the darks is with the dithering method which is increasingly common in modern astrophotography programs. During the dithering process, the telescope is slightly shifted in random directions between exposures, with the result that while the stars change position, any fixed noise pattern appears in the same pixels so that with the process of aligning the stars and stacking the lights, algorithms are used that reject the pixels that do not resemble the average surrounding parameters of the rest of the images. In a few words we distinguish which are stars and which are hot pixels. Dithering has largely replaced dark frames as it is done automatically by the program controlling the equatorial base and requires no user intervention at all. Another big problem is also solved ideally with dithering, that of trails from airplanes, satellites, and meteors.

A dark frame contains three types of noise known as read out noise, dark current & bias.
Bias Frames
The bias frame contains the polarization signal, i.e. the noise produced by the electronic parts of the camera as it reads the values of each pixel on our sensor, also known as readout noise, and as we already mentioned, this information is also present in the darks. To detect this signal and be able to remove it the images must be taken with zero exposure time in the dark. Many argue that bias frames are only wise to use when the darks we have are of a different duration than the light frames, in which case we calibrate the darks with the bias.
How to take Bias Frames
We place the lens cap or the shade of our telescope and with our shutter closed and the highest speed available, e.g. 1/8000, we take photos at the same temperature as we took our lights. As downloads are very easy and fast, we do from 50 to 100.

Ένα master Bias δημιουργημένο από 250 bias. image by chrisvdberge
Flat Frames
Most lenses and telescopes do not distribute light evenly across the camera sensor, resulting in images being brighter in the center and darker at the edges, known as vignetting. This problem is solved with flat frames, those exposures that represent the structure and shape of our field since they show how the light is distributed to our sensor from a uniformly illuminated source. Flats also remove the effects of dust and smudge that settle on our sensor.
How to take Flat Frames
There are two ways to create flats. In the past, astrophotographers would place a piece of white cloth in front of the telescope, and after stretching it they would point the telescope at the sky at dawn to create the flats. This technique has many difficulties as it must be done after sunset or before dawn in an area of the sky that is uniformly illuminated. There are ready-made flat boxes on the market that offer a varying intensity of light evenly distributed that makes shooting flats very easy, but many alternatively use a tablet and a computer with a white background to take their flats. The important thing to remember is that the optical path of our equipment must not have changed in relation to the lights, which means that the camera must not have moved and the focus of our telescope or lens must not have changed at all. Additional filters, dew curtains, correctors/flatteners, lens sunshades, and anything else that interferes with the visual path should not be repositioned or removed. Theoretically, the correct exposure of the flats is done when the average ADU value of the shot is half of the Full Well Capacity of our camera. Practically this means that we choose the aperture priority in the camera (AV mode) and our shot should be on the histogram in the middle or at 1/3. For those who want precision, ideal ADUs can be found by analyzing our frames in programs such as Pixinsight, Iris, nebulosity, etc. ADUs are nothing more than the number of electrons that each pixel can collect.
Summarizing the method of shooting Flats, we take care of the following:
We place the telescope in front of a uniformly lit flat box, computer, or tablet that covers our lens.
We check the focus and arrangement of our optics to be the same as the lights
We place our camera in AV mode and shoot 20-50 flats with the same iso, and aperture with our lights, trying to have the shots be at 1/2 or 1/3 of the histogram (correct by using the EV or increasing or decreasing the dimmer of the Flat box).
We make sure that our shutter speed is greater than 2-3 sec as there is a possibility that the electronic shutter will introduce some kind of shadow in our Flat Frames.
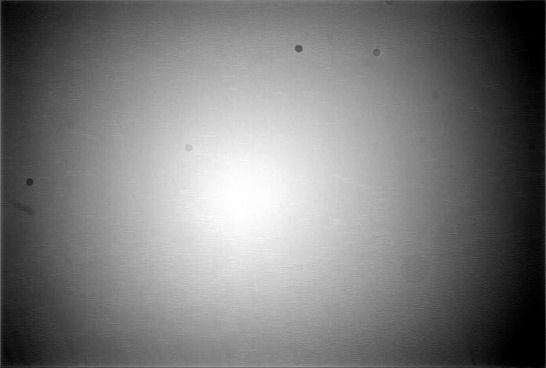
Vignetting and dust on the sensor, typical fit of a flat.
Dark flat frames
As the flat frames also contain noise which will be added to the light, it is recommended to shoot dark flat frames, i.e. exposures with the same settings that we shot the flats in total darkness (lens cap on). As they are done equally fast we can shoot at least half of the total number of flat frames.
Conclusion
The calibration frames offer a spectacular improvement of the SNR since they remove from our photos many noise signals that drown the few photons that we painstakingly collect for this reason and it would be good if they were not omitted. Creating them can be a bit complicated for beginners and quite time-consuming if we add a rather long time to get used to processing them but the payoff is too big to ignore. The good thing is that there are many cloudy nights and with proper organization, we can create files with darks and bias per temperature and iso even if we don't have the corresponding lights, and use them in our future shots.